Halloween is my absolute favorite time to unleash my inner decorator! There’s something so captivating about the gothic, Victorian aesthetic – it’s the perfect blend of spooky and stylish. Every year, I get the itch to create new Halloween decorations, and this year is no exception. I’m thrilled to share my latest DIY project: a Spooky Halloween “Family” Photo Frame that’s sure to add a touch of eerie elegance to your home.
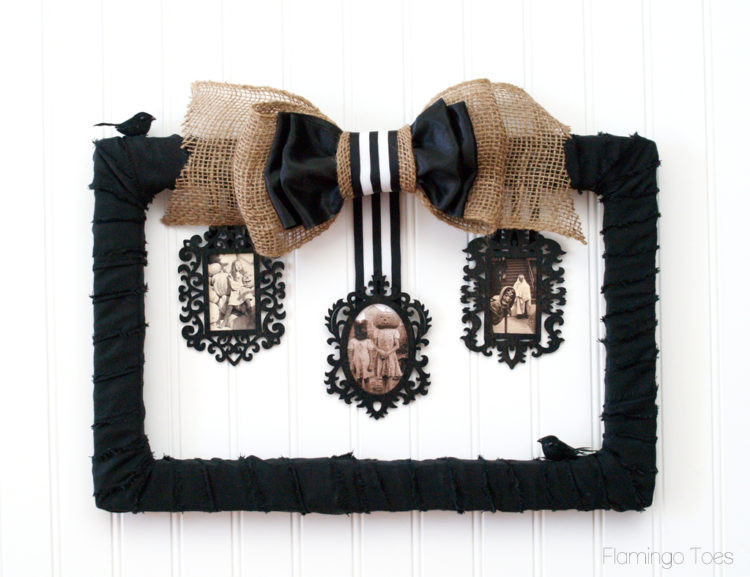
A charmingly spooky Halloween family photo frame featuring vintage-style photographs and gothic embellishments, perfect for displaying cherished family memories with a Halloween twist.
I envisioned a unique Halloween photo frame, one that stepped away from the typical and embraced the wonderfully weird. This frame is adorned with fascinating old Halloween photos that are both creepy and captivating. It’s a fun way to display your “family” – be it your quirky crew or a collection of vintage Halloween characters!
Close-up of the creepy Halloween photo frame showcasing the burlap bow, black fabric wrap, and miniature gothic frames holding spooky black and white photos, emphasizing the handmade and eerie details.
The best part? This project is incredibly budget-friendly and easy to assemble. You don’t need to be a crafting pro to create this eye-catching Halloween decoration.
 black and white halloween photo frame
Let’s gather our supplies and get started on making your own spooky Family Photo Frame!
 Halloween photo decoration
Materials You’ll Need:
- FloraCraft® Make It: Fun® Foam Rectangle: (approximately 12 x 18 inches – adjust as desired for your photo frame size)
- Burlap Garland: Adds a rustic, Halloween touch
- Black Fabric: For wrapping the frame and creating a spooky base
- 3 Small Scroll Frames: These provide a vintage, gothic detail (available at craft stores like Michaels)
- Spray Paint or Craft Paint (Black): To paint the small frames for a统一 cohesive look
- Black Satin Ribbon: For adding elegance to the bow
- Striped Ribbon: Provides a contrasting pattern for the bow
- Spooky Photos: Vintage Halloween photos or family photos with a spooky filter!
- Hot Glue Gun and Glue Sticks: Essential for quick and secure assembly
- 2 Miniature Crows: For adding a touch of creepy-cute charm
Step-by-Step Guide to Creating Your Spooky Family Photo Frame:
1. Crafting the Base Frame from Foam:
We’ll begin by constructing a lightweight and easy-to-handle frame using Styrofoam. Take your FloraCraft® Make It: Fun® Foam rectangle and, using a ruler, draw a line 1 1/2 inches inward from all edges. This will define the border of your frame.
Marking a Styrofoam rectangle with a ruler and pen to create guidelines for cutting out the center and shaping the DIY photo frame.
Carefully use a Styrofoam cutter or a utility knife to cut out the center rectangle piece, following the lines you just drew. Take your time and ensure clean cuts for a neat frame.
Cutting the center out of a Styrofoam rectangle with a craft knife, carefully following marked lines to create the frame shape for the Halloween photo display.
Once you’ve removed the center, you should be left with a simple, lightweight rectangle frame made of Styrofoam.
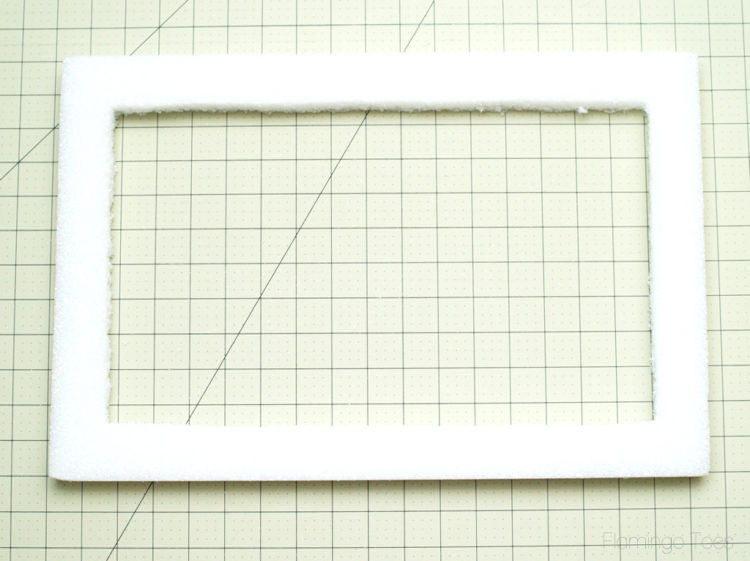 Styrofoam Frame
2. Wrapping the Frame in Black Fabric:
To give the frame a spooky and sophisticated base, we’ll wrap it in black fabric. Tear 2-inch wide strips of your black fabric. Tearing instead of cutting gives the fabric edges a slightly frayed, textured look that enhances the gothic feel. Wrap these strips around the Styrofoam frame, overlapping slightly as you go. Use hot glue on the back to secure the fabric edges and ends as you wrap, ensuring the entire frame is covered.
3. Creating the Burlap and Ribbon Bow:
Now, let’s craft a beautiful bow to adorn the top of our frame. Cut your burlap garland into two strips: one 15 inches long and the other 20 inches long. Also, cut a length of satin ribbon about 30 inches long.
Trim the 15-inch burlap strip by cutting small triangles into the ends to create a decorative finish. Fold the 20-inch burlap piece so that the ends overlap slightly. Fold the satin ribbon in a zig-zag fashion, creating two loops on each side to form the bow shape.
Components for making a burlap and ribbon bow, including cut strips of burlap garland and black satin ribbon, laid out ready for assembly into a decorative bow.
Stack the bow pieces together, layering the satin ribbon on top of the burlap pieces. Sew a gathering stitch down the middle to bring all the layers together and create the bow shape. If you prefer, you can also carefully hot glue the layers together.
Sewing a gathering stitch through the layers of burlap and ribbon to assemble the bow for the Halloween photo frame, creating gathers and shaping the bow.
To finish the bow’s center, cut a 6-inch piece of burlap garland. Fold the long sides of this strip inward towards the center, and then wrap it tightly around the middle of the bow, concealing the gathering stitches or glue. Secure it in place by sewing or gluing at the back. Finally, wrap a strip of striped ribbon around the center of the bow, over the burlap, and again, sew or glue it in place. This adds another layer of texture and visual interest.
A finished burlap and striped ribbon bow for Halloween decoration, showcasing layers and textures ready to be attached to the spooky family photo frame.
4. Preparing and Attaching the Spooky Photos:
Now for the spooky family photos! Search online for “vintage Halloween photos” or “spooky old Halloween photos.” You’ll find a wealth of wonderfully eerie images. Choose three that you like and print them out in a size that will fit nicely behind your small scroll frames. (The frames used in this project are from Michaels, but similar frames are widely available at craft stores).
A selection of spooky old Halloween photos printed and ready to be framed and incorporated into the DIY Halloween family photo frame decoration.
Paint your small scroll frames with black spray paint or craft paint and let them dry completely. Once dry, glue the spooky photos behind the frames, centering them so they look their best.
5. Adding Ribbon Hangers to the Small Frames:
To hang the framed photos from the main frame, we’ll create ribbon hangers. Cut two 3 1/2-inch strips of ribbon and one 5 1/2-inch strip of ribbon. Glue the 5 1/2-inch strip to the back of the frame you want to use as the center frame. Glue the 3 1/2-inch strips to the back of the other two frames.
Ribbon strips being glued to the back of small decorative frames to create hangers for attaching them to the main Halloween photo frame structure.
Next, glue the top parts of these ribbon strips to the back side of the large, fabric-wrapped frame, spacing them as desired. Arrange the center frame slightly higher and the side frames at a lower level for a visually appealing staggered effect.
Attaching the framed spooky photos to the fabric-wrapped Styrofoam frame by gluing the ribbon hangers to the back, creating a layered photo display.
6. Final Touches: Bow and Crows:
Glue the burlap bow you created to the top center of the fabric-wrapped frame. This adds a beautiful focal point and enhances the overall gothic charm.
The burlap and ribbon bow being attached to the top of the Halloween photo frame, adding a decorative and textural element to the spooky craft.
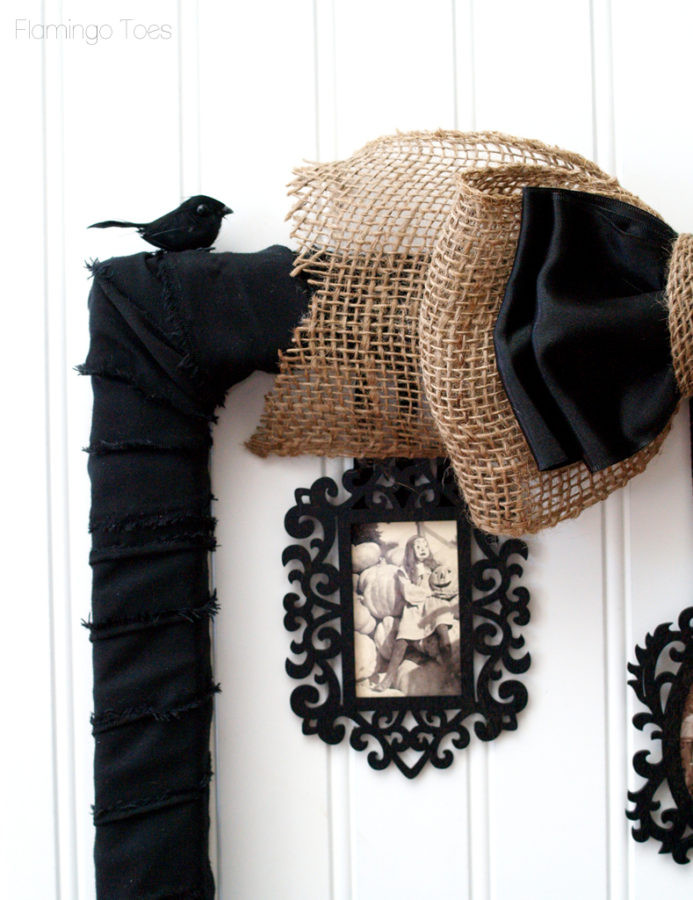
Finally, glue on the two miniature crows! Position them on or near the bow, or wherever you think they look best. These little crows add the perfect touch of spooky-cute Halloween flair.
A miniature crow glued onto the Halloween family photo frame, adding a final spooky and whimsical touch to the handcrafted decoration.
7. Display and Enjoy Your Spooky Creation!
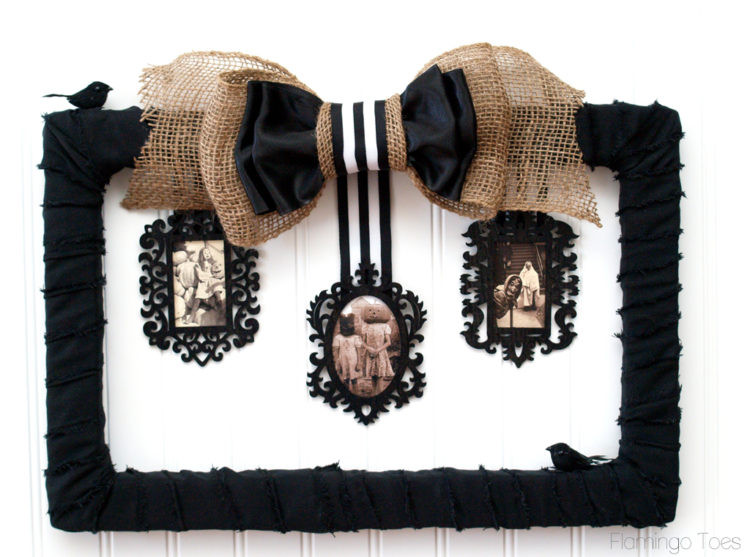
Congratulations, you’ve completed your Spooky Halloween Family Photo Frame!
The finished spooky Halloween family photo frame, decorated with vintage photos, burlap bow, miniature frames, and crows, ready for display as Halloween home decor.
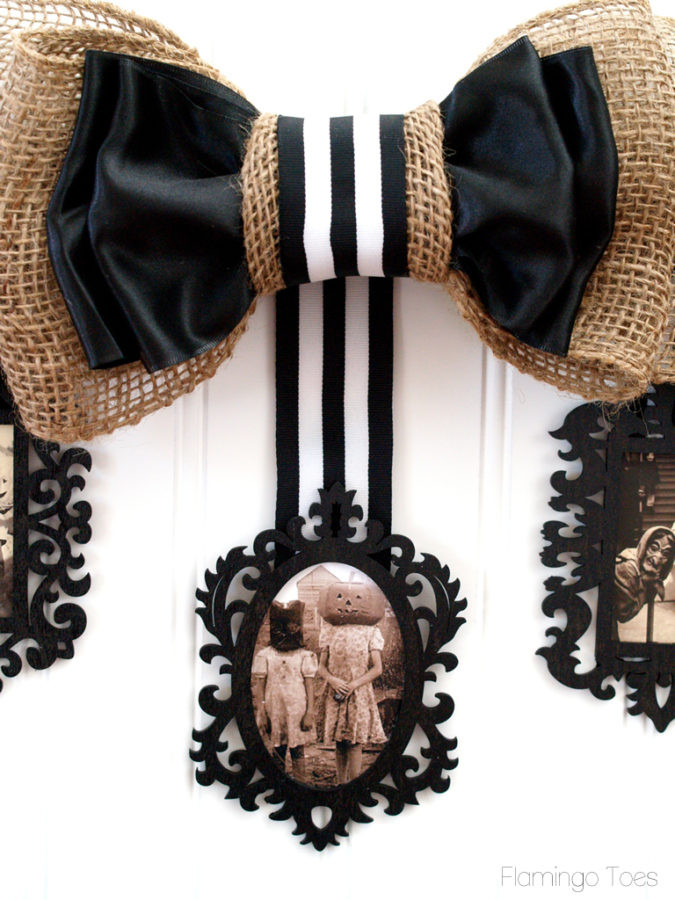
These vintage photos are wonderfully eerie, aren’t they? They add just the right amount of creepiness – in the best possible way!
A vintage spooky costume photo displayed within the Halloween frame, showcasing the frame’s ability to highlight eerie and old-fashioned images.
 Halloween antique photo frame
 spooky photo frame
Isn’t it fun? Get ready for more Halloween project ideas coming soon – I can’t wait to share them with you!
Disclosure: This is a sponsored post on behalf of FloraCraft® Make It: Fun® Foam. All opinions and ideas are my own. 🙂